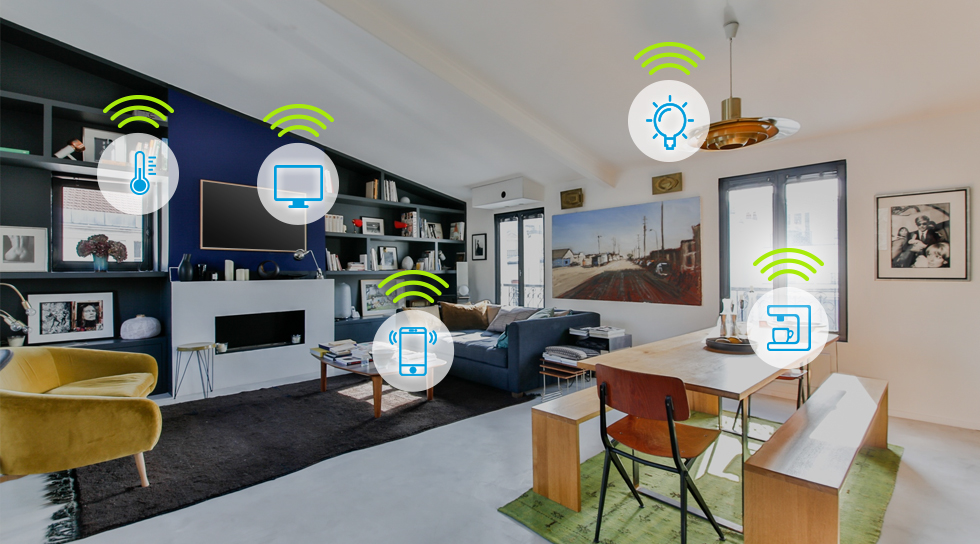
The idea of a “smart home” can feel intimidating, like it’s some tech wizardry only experts can handle. But here’s the thing: it doesn’t have to be that way. With the right tools, anyone can create a smart, connected home without spending a fortune. One of the best and most affordable ways to do this is with a Raspberry Pi.
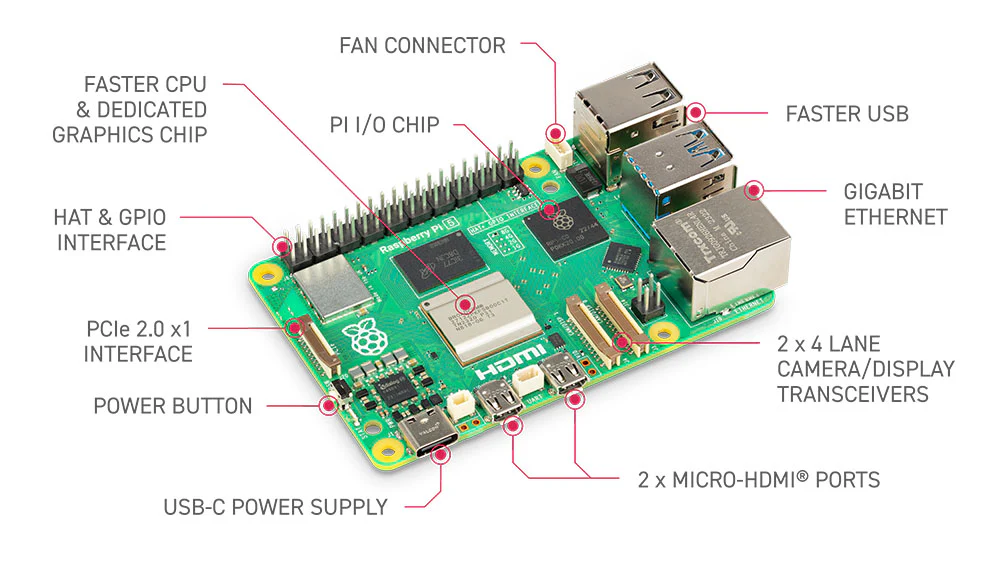
So, what exactly is a Raspberry Pi? It’s a credit card-sized computer that was originally created by the Raspberry Pi Foundation to promote computer science education. Over time, it became popular for DIY electronics projects because it is affordable, energy-efficient, and extremely versatile. It can run a variety of operating systems, including Raspberry Pi OS, and supports programming languages like Python and JavaScript. People use it for all kinds of things, from building weather stations to retro gaming consoles.
In home automation, it acts as the brain of the operation, allowing you to control smart devices, automate tasks, and even enhance security, all without needing an expensive setup. If you’re wondering how to use a Raspberry Pi for home automation, this guide will break it down step by step. We’ll cover everything from setup to practical applications, making sure you have a seamless, beginner-friendly experience.
Quick Links
Why Use a Raspberry Pi for Home Automation?
First things first, why is this Raspberry Pi perfect for automating your home?
Affordable
Smart home hubs from big brands can be expensive, often costing hundreds of dollars. A Raspberry Pi, on the other hand, is a budget-friendly alternative that can do just as much, if not more, for a fraction of the price. Even the latest models are significantly cheaper than most pre-built smart home systems. This makes it a great option for anyone looking to automate their home without spending a lot of money.
Customizable
Most commercial smart home systems come with preset features and limitations, meaning you can only do what the manufacturer allows. With a Raspberry Pi, you have complete control over your setup. You can choose which devices to connect, create custom automation scripts, and tweak everything to fit your specific needs. For example, if you want to automate lights based on motion detection or control your thermostat remotely, you can design your system exactly the way you want.
Supports Multiple Devices
A Raspberry Pi can connect to all sorts of smart devices, including lights, security cameras, thermostats, smart plugs, and even door locks. Unlike some hubs that only work with specific brands, a Raspberry Pi is not tied to any one ecosystem. This means you can mix and match devices from different manufacturers without compatibility issues. It’s a flexible solution that allows you to expand your smart home over time.
No Subscription Fees
Many smart home platforms require monthly subscriptions to access advanced features, cloud storage, or remote access. With a Raspberry Pi, there are no hidden costs. Once you set it up, you can use it freely without worrying about ongoing fees. This makes it a cost-effective option, especially for those who want full control over their smart home without being locked into a paid service.
Open-Source Community
One of the biggest advantages of using a Raspberry Pi is the massive open-source community behind it. If you ever run into an issue, there are countless forums, tutorials, and guides available to help you troubleshoot and improve your setup. Many developers also create free software and add-ons that expand the functionality of your home automation system. No matter what you’re trying to build, chances are someone has already done it and shared their knowledge online, making it easier for you to get started.
What Do You Need to Get Started?
To begin your home automation journey with a Raspberry Pi, you’ll need:
- A Raspberry Pi 4 (or later)
- A microSD card (32GB or more)
- A power adapter (5V 3A recommended)
- Internet connection (Ethernet or Wi-Fi)
- A keyboard, mouse, and monitor (for initial setup)
- Home automation software (e.g., Home Assistant, OpenHAB, or Domoticz)
- Smart devices (e.g., smart bulbs, motion sensors, smart plugs)
Now, let’s move on to setting up your Raspberry Pi for home automation.
How to Set Up a Raspberry Pi for Home Automation
Step 1: Install Raspberry Pi OS
Before installing any home automation software, you need to set up Raspberry Pi OS.
- Download Raspberry Pi Imager from the official Raspberry Pi website.
- Insert your microSD card into your computer.
- Use Raspberry Pi Imager to install Raspberry Pi OS (Lite or Full).
- Insert the microSD card into your Raspberry Pi and power it on.
- Follow the on-screen setup instructions.
Step 2: Install Home Automation Software
There are several great open-source home automation platforms available:
Option 1: Home Assistant (Recommended for Beginners)
Home Assistant is one of the most powerful and user-friendly automation platforms.
- Open the terminal on your Raspberry Pi.
- Install Docker:
curl -fsSL https://get.docker.com | sh - Install Home Assistant:
sudo docker run -d --name=home-assistant --restart=unless-stopped -p 8123:8123 homeassistant/home-assistant - Access Home Assistant via a web browser:
http://<your-raspberry-pi-ip>:8123 - Follow the setup instructions to connect your smart devices.
Option 2: OpenHAB (More Advanced Users)
OpenHAB is another powerful automation platform with a strong community.
- Install OpenHAB:
sudo apt-get update && sudo apt-get install openhab - Access OpenHAB via a web browser:
http://<your-raspberry-pi-ip>:8080 - Configure your devices through the OpenHAB interface.
Best Home Automation Projects with Raspberry Pi
1. Smart Lighting Control
Use your Raspberry Pi to control smart bulbs and LED strips.
- Connect Philips Hue, LIFX, or TP-Link smart bulbs to Home Assistant.
- Set up automation to turn lights on/off based on motion sensors or schedules.
- Use voice commands with Alexa or Google Assistant.
2. Security Camera & Motion Detection
Turn your Raspberry Pi into a DIY security system:
- Use MotionEyeOS to set up a Raspberry Pi Camera Module or USB webcam.
- Configure motion detection alerts to your phone or email.
- Store footage on a local or cloud server.
3. Smart Thermostat Control
Control heating and cooling based on room occupancy:
- Integrate Nest, Ecobee, or DIY temperature sensors.
- Automate temperature adjustments when you leave or enter a room.
4. Voice-Controlled Smart Home
Make your own smart assistant:
- Install Mycroft AI for voice control.
- Use MQTT to connect Raspberry Pi to Alexa or Google Home.
- Control appliances using voice commands.
5. Remote Access & Automation
Control your home from anywhere:
- Set up VPN or SSH access to your Raspberry Pi.
- Use Home Assistant’s mobile app for remote control.
- Automate blinds, sprinklers, or alarms.
Setting up VPN or SSH access to your Raspberry Pi is essential if you want to control your smart home remotely and keep your system secure. SSH (Secure Shell) allows you to connect to your Raspberry Pi from another device, like your laptop or smartphone, so you can manage automation settings, update software, or troubleshoot issues without needing a physical keyboard and monitor.
A VPN (Virtual Private Network), on the other hand, lets you securely access your Raspberry Pi from anywhere in the world, as if you were connected to your home network. This is useful if you want to check your security cameras, adjust your thermostat, or control other smart devices while you’re away. Both SSH and VPNs add a layer of security, preventing unauthorized access and ensuring that only you can manage your home automation system.
Common Issues and Troubleshooting
Why is My Raspberry Pi Not Detecting Smart Devices?
- Make sure your devices are on the same network as your Raspberry Pi.
- Restart the Raspberry Pi and router.
- Check if your home automation software (like Home Assistant or OpenHAB) has the necessary integrations installed.
- If using Zigbee or Z-Wave devices, ensure you have the correct USB adapter installed.
- Verify that your firewall or router settings are not blocking device communication.
Why is my Raspberry Pi not connecting to Wi-Fi?
- Make sure you have entered the correct Wi-Fi credentials in the Raspberry Pi settings.
- Check if your router has MAC address filtering enabled, which may be blocking your Pi.
- Try moving the Raspberry Pi closer to the router to improve the signal strength.
- Restart both your Raspberry Pi and router to reset the connection.
- If you are using a headless setup, verify that the Wi-Fi configuration file (
wpa_supplicant.conf) is set up correctly.
Also Read: 10 Tips to Boost Your Internet at Home (For Router Owners)
Why is my Raspberry Pi running slow?
- If you’re using an older Raspberry Pi model, upgrading to a Raspberry Pi 4 or higher can significantly improve performance.
- Use an SD card with at least Class 10 speed to avoid lag.
- Reduce background processes by disabling unnecessary services running in the background.
- Consider using an external SSD instead of an SD card for better speed and reliability.
- Make sure your Raspberry Pi is not overheating by using heat sinks or a cooling fan.
How do I fix Raspberry Pi boot issues?
- If your Raspberry Pi does not boot, try using a different SD card or re-flashing Raspberry Pi OS.
- Make sure the power supply provides enough voltage (5V 3A is recommended for Raspberry Pi 4).
- Remove any external devices (USB drives, HDMI cables, etc.) and try booting again.
- If you see a blank screen, try connecting the Raspberry Pi to a different monitor or TV.
Why is my Raspberry Pi overheating?
- Ensure your Raspberry Pi is in a well-ventilated area.
- Use a cooling fan or heat sinks to improve heat dissipation.
- Reduce processor load by stopping unnecessary background processes.
- Update the firmware using the command:
sudo apt update && sudo apt upgrade - If overclocking your Raspberry Pi, consider reducing the clock speed to lower heat output.
Why is my Raspberry Pi home automation system not responding remotely?
- Make sure your VPN or SSH settings are properly configured for remote access.
- Check that port forwarding is enabled on your router if using SSH.
- Restart the Raspberry Pi and check for internet connectivity issues.
- Verify that your home automation software is running by accessing it via a local browser.
- If using a dynamic IP, consider setting up a dynamic DNS (DDNS) to maintain a stable remote connection.
How to Improve Raspberry Pi Performance for Automation?
- Use a Raspberry Pi 4 or better for faster processing.
- Store logs and databases on an external SSD instead of an SD card.
- Reduce the number of background tasks running on the Pi.
Can I Use a Raspberry Pi Zero for Home Automation?
Yes, but performance may be slower. Raspberry Pi 4 or better is recommended for smoother automation.
So, bottom line?
You don’t need to break the bank or get locked into some fancy, pre-made system to have a smart home. That little Raspberry Pi? It’s like your own personal smart home workshop. You get to build exactly what you want, when you want, and how you want it. Plus, you’ll learn a ton along the way. It’s about taking control, getting creative, and making your home work for you, without all the expensive bells and whistles. And honestly, there’s something pretty cool about knowing you built it yourself, right?