Losing an Excel file due to a sudden crash can be incredibly disheartening. You’ve spent hours entering data, creating formulas, and organizing information, only for everything to disappear in an instant. It’s a nightmare that most Excel users have faced at some point. But don’t panic just yet! Microsoft Excel has built-in features that can help you recover your lost work, and there are other ways to restore unsaved files as well.
Let’s go over how to find your unsaved Excel files after a crash, so you don’t have to redo all that work. Ready to get it back?
In This Post
Where Do Unsaved Excel Files Go?
Before jumping into the recovery methods, it helps to understand where Excel stores unsaved files. When Excel crashes or you accidentally close a file without saving, the program automatically saves temporary copies in specific locations. These include:
- AutoRecover Folder: Excel periodically saves temporary backups of your work in case of unexpected shutdowns.
- Temporary Files Folder: Windows sometimes stores unsaved Excel files in the temp folder.
- OneDrive (If Enabled): If you have OneDrive sync turned on, you may find a version of your file saved in the cloud.
Now, let’s go through the steps to recover your lost file.
How to Recover an Unsaved Excel File Using AutoRecover
AutoRecover is one of the most useful built-in features of Excel. Here’s how to use it:
- Open Excel.
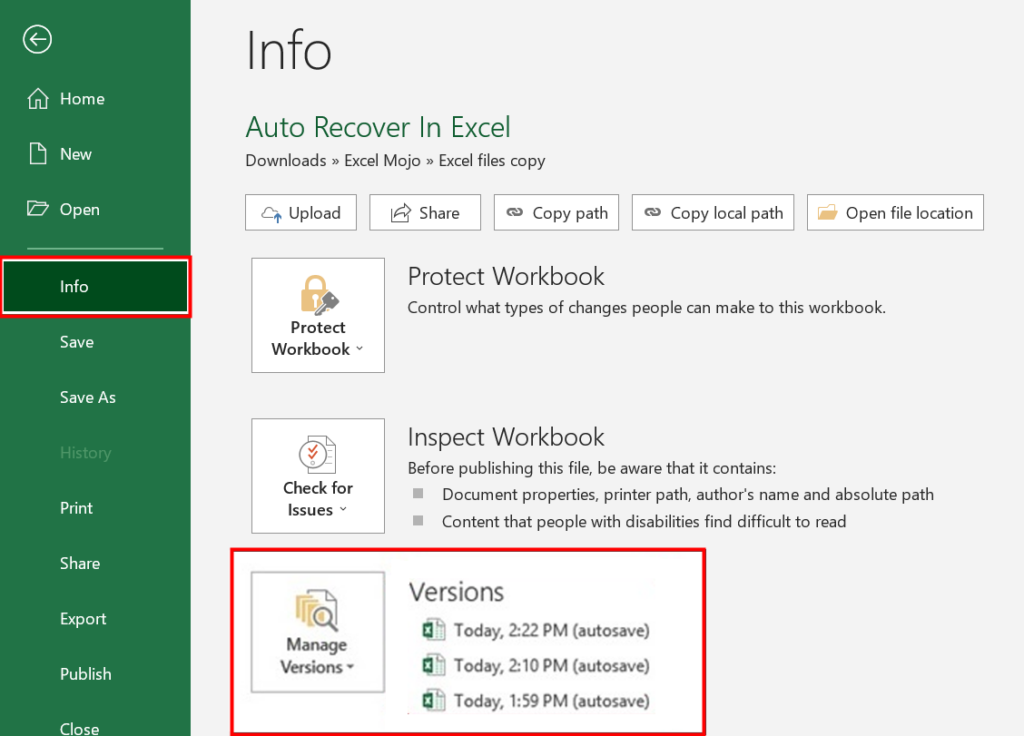
- Click on File > Info.
- Look for the Manage Workbook section.
- Click Recover Unsaved Workbooks.
- A list of unsaved files will appear. Select the one you need and click Open.
- Once the file opens, immediately click Save As to prevent losing it again.
If you don’t see your file here, move on to the next method.
How to Find Temporary Excel Files
Excel sometimes stores unsaved files in the temporary folder. Here’s how to check:
Step 1: Locate Temporary Files
- Press Windows + R to open the Run dialog.
- Type %temp% and press Enter.
- Look for files with names like ~Excel####.tmp.
- Open any file that matches your lost work.
Step 2: Open the File in Excel
If you find a temp file that looks like your lost work, right-click and try opening it in Excel. If it opens, save it immediately.
How to Recover an Overwritten or Deleted Excel File
If your file wasn’t just unsaved but actually deleted or overwritten, here’s how to retrieve an older version:
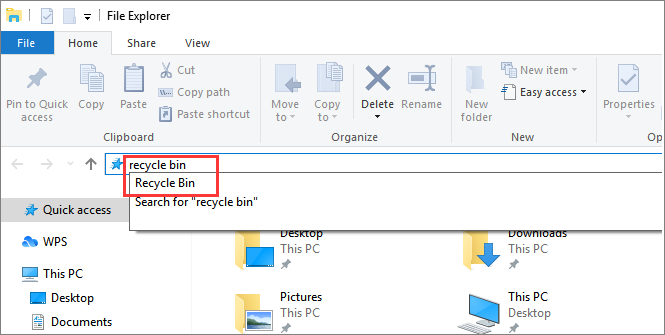
1. Check the Recycle Bin
- Open the Recycle Bin on your desktop.
- Look for your Excel file.
- If you find it, right-click and choose Restore.
2. Restore a Previous Version
If you’ve accidentally saved changes that you want to undo, you can restore an older version:
- Right-click on the Excel file (if it still exists in the original folder).
- Click Properties.
- Go to the Previous Versions tab.
- Select an earlier version and click Restore.
3. Recover from OneDrive (If Enabled)
If you use OneDrive, follow these steps:
- Go to OneDrive and log in.
- Locate the Excel file.
- Right-click and select Version History.
- Choose an older version and restore it.
How to Enable AutoSave and AutoRecover for Future Protection
To prevent losing files in the future, it’s a good idea to enable Excel’s AutoSave and AutoRecover features.
Step 1: Enable AutoRecover
- Open Excel and go to File > Options.
- Click Save on the left panel.
- Make sure Save AutoRecover information every X minutes is checked.
- Set the time interval (e.g., every 5 minutes for frequent backups).
Step 2: Enable AutoSave for OneDrive Users
If you store files in OneDrive, AutoSave can protect your work in real time:
- Open an Excel file.
- Look for the AutoSave toggle at the top.
- Turn it on to save changes automatically.
Losing an unsaved Excel file due to a crash can be frustrating, but with the right steps, you can often recover your work. Start by checking Excel’s AutoRecover, searching for temporary files, and using OneDrive version history if applicable. To avoid this situation in the future, enable AutoSave and AutoRecover, and consider backing up important files regularly.